Post production workflow And how to use smoothing 2.0
Most images that you shoot with the RamperPro will have a difference between the desired shutterspeed and the actual realized shutterspeed. The desired shutterspeed is the shutterspeed that is calculated by the ramping algorithm. The realized shutterspeed is the speed that was actually used to take the picture. The use of normal shutterspeeds will give discrete steps which will result in hops in the exposure of your timelapse sequence. Nikon cameras have these discrete steps even in their bulb mode; but it must be said that these steps are small on modern cameras like the D800.
This is why the RamperPro is creating a small XMP file for every picture on the SD card of the RamperPro. This XMP file holds the, per image, exposure compensation. This compensation can automatically be used by Adobe After Effects or Adobe Lightroom to compensate the exposure of the images. This result are absolutely flicker free timelapse movies when you use the RamperPro. Visible flickering can only be the result of an inaccurate shutter; but we have not encountered that ourselves yet. The XMP files contain a very accurate exposure compensation value because the RamperPro can very accurately determine that value. The value is calculated when normal shutterspeeds are used while the value is measured via the PC sync cable when the camera is in bulb mode.
How to find all required XMP files
There are two ways that can be used to get the XMP files from the RamperPro:
- Get the SD card from the RamperPro and use a normal SD card reader to connect the card to your computer. This will result in two folders that will become available. One folder contains a folder with camera1 and camera2 as subfolders. This is the one where the XMP files are stored. Don’t modify the contents of the other system folder!
- Connect the RamperPro to your local computer network by connecting a network cable to the network connector and power the RamperPro. The network connector is the connector next to the double USB connectors. Don’t connect the network cable to the MoCoBus connector on the other side of the unit. You should now be able to see a network device called ramperpro on your Windows or OSX machine. Open the XMP folder and then you are able to see the XMP files for camera1 and camera2. It might be that your camera is asking for login credentials; just do an anonymous login and you should be able to see the files directly on the RamperPro.
|
|
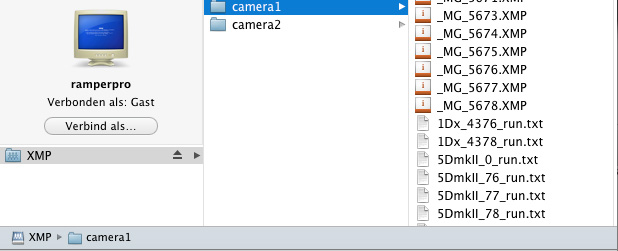
| Here you see the XMP/camera1 folder on a Mac when the RamperPro is connected via a network connection. |
Load your images and add the XMP files
The camera1 and camera2 folders also contain so called run files. These files contain detailed information about your shoot and the images that were taken. You can use these files to determine the first and last image and thus the first and last XMP file of your timelapse sequence.
Now copy the, preferably RAW, files of your shoot to a folder on your computer or any other location that you use to process your images. Now copy the accompanying XMP files to that same folder. You can now startup your Adobe tool of choice, we use Adobe Light Room in this example. Import the folder into Lightroom. Lightroom will automatically import the XMP files together with your images. You can see that because the exposure compensation per image in Lightroom is already set. We have encountered issues on Apple computers in the past. The XMP files were not recognized by Lightroom and they were not imported. Please read this article on our blog about how to overcome this issue.
You can now crop the images and export them to DNG, TIFF or JPG images that can be used to render your timelapse movie with. We prefer Adobe After Effects for this, but Apples Quick Time Pro or many other software packages should also give you satisfying results.
Backup your XMP files
We deeply recommend to keep a copy of your XMP files. It's easy to overwrite the contents of these files when you make a mistake in Lightroom. You will then loose your valuable information that you need to create flicker free ramping movies with the RamperPro. We always create a subfolder next to the folder that holds the RAW files. We use that folder, called XMP, to store a backup copy of the XML files. Don't rely on the RamperPro as a backup device since the XML files can be overwritten when the filename cycles from 999 to 001.
|
|
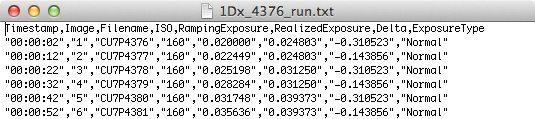
| Here you see a part of the run file that shows all images that have been taken during the shoot. |
Create your timelapse movie
A description about how to create a timelapse movie based on your images is a bit out of the scope of the RamperPro user manual. We follow a very basic workflow. That looks like this:
- Copy the images from the camera to a folder
- Copy the XMP files from the RamperPro to this folder (backup the XMP files in a second location)
- Made sure that the images are show and sorted by their creation time
- Import the images into Lightroom
- Crop one image to get a 16:9 aspect ration
- Synchronize the crop and white balance setting of this image to all the other images. Don't synchronize the exposure correction
- Export all the images to jpeg or DNG files. We like to number the files so that we are absolutely sure that they are found back in the correct order
You can now make a timelapse movie with your tool of choice like Apple Quick Time Pro or Adobe After Effects.
How to apply the smoothing 2.0 algorithm on shoots made with firmwares earlier than 3068
Firmware 3068 and higher contain the smoothing 2.0 algorithm that creates the smoothest ramping curve possible. There is no need to use any expensive and difficult deflicker software to iron out small imperfections in the XMP data.
It is possible to use the smoothing 2.0 algorithm on shoots made with earlier firmwares! That way you can recreate the XMP files for previous shoots. This is possible by feeding the runfile of your previous shoots into the RamperPro firmware. You need to add so called tags in the runfile that tell the RamperPro which part of the shoot you want to smooth. These tags are automatically written by the RamperPro in firmware 3068 and higher. Here is an example that shows how to modify the runfile:
SmoothStart
"21:01:27","00:06:02","37","_DSC9054","100","0.007472","0.006201","0.268992","Normal","1","00:04:24","0x0","/mnt/evr/camera1/D4S_9018_xmp"
"21:01:38","00:06:13","38","_DSC9055","100","0.007672","0.006201","0.307088","Normal","1","00:04:22","0x0","/mnt/evr/camera1/D4S_9018_xmp"
"21:01:47","00:06:22","39","_DSC9056","100","0.007885","0.007812","0.013341","Normal","1","00:04:21","0x0","/mnt/evr/camera1/D4S_9018_xmp"
"21:01:57","00:06:32","40","_DSC9057","100","0.008098","0.007812","0.051743","Normal","1","00:04:20","0x0","/mnt/evr/camera1/D4S_9018_xmp"
"21:02:07","00:06:42","41","_DSC9058","100","0.008318","0.007812","0.090458","Normal","1","00:04:18","0x0","/mnt/evr/camera1/D4S_9018_xmp"
"21:02:18","00:06:53","42","_DSC9059","100","0.008544","0.007812","0.129172","Normal","1","00:04:18","0x0","/mnt/evr/camera1/D4S_9018_xmp"
"21:02:27","00:07:02","43","_DSC9060","100","0.008804","0.007812","0.172437","Normal","1","00:04:17","0x0","/mnt/evr/camera1/D4S_9018_xmp"
"21:02:37","00:07:12","44","_DSC9061","100","0.009045","0.007812","0.211257","Normal","1","00:04:17","0x0","/mnt/evr/camera1/D4S_9018_xmp"
"21:02:48","00:07:23","45","_DSC9062","100","0.009292","0.007812","0.250183","Normal","1","00:04:16","0x0","/mnt/evr/camera1/D4S_9018_xmp"
"21:02:58","00:07:33","46","_DSC9063","100","0.009574","0.007812","0.293295","Normal","1","00:04:18","0x0","/mnt/evr/camera1/D4S_9018_xmp"
SmoothEnd
The SmoothStart and SmoothEnd tags tell the RamperPro which images need smoothed XMP data. You want to place these tages just before the first image and after the last image that is mentioned in the runfile. But you can choose not to smooth all images.
You now need to copy the runfile to the "smooth" folder on the RamperPros' SD card next to the camera1 and camera2 folder. This can be difficult on WIndows because Windows cannot write on this partition (as explained here). You can still copy the files to the RamperPro in that case. Connect the RamperPro to your home network (with a network cable). Then you will find a device called RamperPro. You can then copy the runfile to the smooth folder.
You can now recreate the XMP files. Navigate to the XMP tool in the system menu. You can find the system menu by pressing the tools icon in the button bar. Press the arrow down until you see the XMP icon. Then follow the instructions that you see on the touch screen of the RamperPro. All you need to do is to press the filename of the runfile that you just copied to the smooth folder. Then the XMP files will be recreated.
How to batch process images
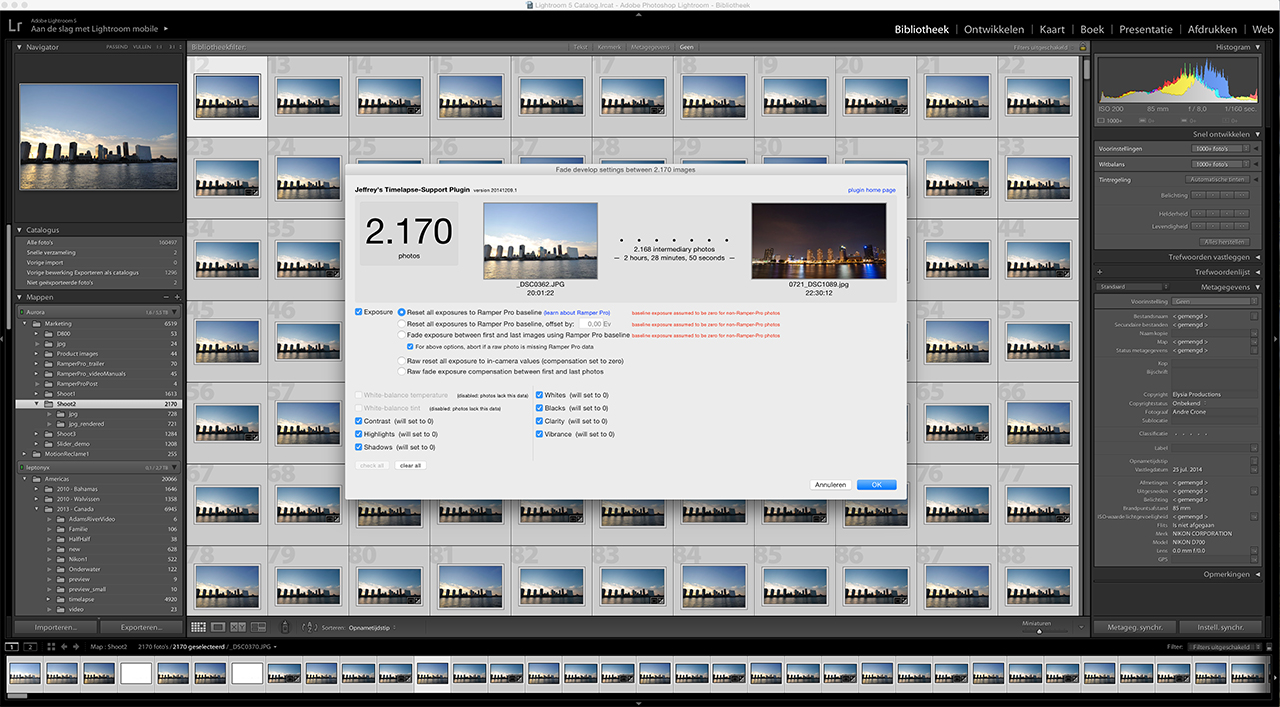 We are very happy to present a new, free, fantastic Lightroom plug in-from Jeffrey Friedl. This native Adobe Lightroom plug-in can be used to bulk process time lapse sequences. The plug-in is RamperPro XMP file aware so you can do all required post processing and still enjoy the flicker free output of the RamperPro.
We have been using the Lightroom plug-in for a while now and it has became an extremely fast way to grade the white balance, exposure, vibrance etc. of the RamperPro shot images. You can made fades or offset the exposure of all images.
This free plug-in will cover most of what you need to process the ETTR output of the RamperPro. The RamperPro is an expose to the right controller. This means that the histogram of the images is kept as bright as possible, without over exposing. The reason for this is that this gives the best situation for easy post processing. This new Lightroom plug-in is all you need to easily post-process your RamperPro images within seconds. The big advantage of this plug-in is that you immediately see the output in Lightroom. Just set grade the white balance and the results are shown.
Note: Yes, this plug-in is RamperPro aware; but it can be used by all timelapse photographers!
You can download your copy here:
http://regex.info/blog/lightroom-goodies/timelapse-support
Other software
Some people prefer to process their images even more in both Adobe Lightroom or in some other post production software package. An example could be to lighten all images with half a stop. That would overwrite the XMP data from the RamperPro which will in turn result into flicker. This is why we have joined hands with LRTimelapse. There is now native support for the RamperPro in LRTimelapse, this enables you to further enhance the images that are taken with the RamperPro.