Basic mode - Intervalometer with interval ramping
Introduction
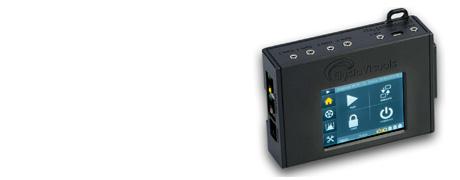
 The basic intervalometer mode of the RamperPro gives you an intervalometer that can be used for "normal" timelapse sequences. Just set the interval between the images that you want to shoot and you are good to go. Don't forget to set the "Number of images" setting because that sets the amount of images that the basic intervalometer will take before it will automatically stop. Set this value to a high value if you don't know how many images you are going to take upfront.
The basic mode supports interval ramping. That makes it possible to make the interval longer or shorter over a number if images.
Settings
| Feature | Description |
| Interval ramping | You can ramp the interval if you like. This means that you can change the interval over time. You just need to set the exposure from which you want to start interval ramping. You can make the interval longer or shorter by entering the required start and end interval. Just set the desired start frame where interval fairing should start and the end frame where the end interval should be reached. You can only enter the start and end interval if you enable interval ramping. |
| Interval | The interval in seconds before a next shot is taken by the RamperPro |
| Shutter speed | There are two ways that you can use to determine the shutter speed of your images. You can either set the camera to a manual speed or in aperture mode. That way the camera will set the exposure of your images. You can also set the camera to Bulb mode and set the required shutter speed here in seconds. Note that most camera's don't support fast shutter speeds in Bulb mode, a value of at least 0.3 should work here. |
| Number of Images | The maximum number of images that you want to shoot. Set this value to a high value if you need to shoot an "unlimited" number of images. |
| Use camera 1 settings | This value is only available for camera two. A value of "Yes" indicates that all settings for camera 2 are taken from the settings of camera 1. |
How to start a normal timelapse sequence
The shutter speed of your camera can be set in two different ways when you run the basic intervalometer mode of the RamperPro:
- The camera determines the shutter speed. Here you set the shutter speed on the camera. This can either be a fixed speed when the camera is in manual mode or a more dynamic speed with the camera is set to aperture priority. Note that you can get flicker in your footage when the shutter speed is not set to a fixed value. Set the shutter speed on the RamperPro to a low value like 0.1s. This time is only used by the RamperPro to trigger the camera because the actual shutter speed is set on the camera.
- The RamperPro determines the shutter speed. This will only work when the camera is set to bulb mode. This means that you cannot use "fast" shutter speeds. Any shutter speed longer than 1/3 seconds will work on most cameras. Here is is important to set the desired shutter speed on the RamperPro. You can use this mode when you are making a timelapse of the Milky way. You need a long shutter speed to do this; lets say 15 seconds. You can then for example set the interval to 17 seconds and the exposure speed to 15 seconds. That gives the camera 2 seconds to save the images to its' memory card.
Very important for Canon users
There is no USB control on your camera when you use basic mode. The only cable that you need to connect is the trigger cable. Please don't connect the USB cable to a Canon camera when the camera is operated in basic mode. A USB cable will block all operations and the RamperPro will not take any images. Only connect a USB cable when you are running the advanced mode because then the blocking USB mode is overcome by the software of the RamperPro.