Camera discovery and timelapse engine selection
Camera discovery
The RamperPro automatically detects a change on the USB connections. The screen will give feedback when a new camera is detected or when a camera is removed. Cameras that are not supported by the RamperPro will be rejected by the software and these cameras can not be used with the controller. The numbering of the connected cameras cannot be influenced since this depends on how they are detected by the USB bus. Your camera will always be connected as camera one when you connect only one camera to the USB bus. It might be possible that this camera will become camera two when you add a second camera to the USB bus.
The trick is to first connect two cameras via USB. You can then see on the display which camera became camera one and which became camera two. You can then connect the shutter release and PC sync cables to the corresponding cameras. You can take a preview image with the RamperPro. That image is then shown on the touch screen. You need to connect both the USB cable and the trigger cable if you want to take a preview image. This way you can always check if the cables for camera one and two are correctly installed because camera one should fire for preview image 1 and camera two should fire for preview image 2.
Configuring the engine per camera
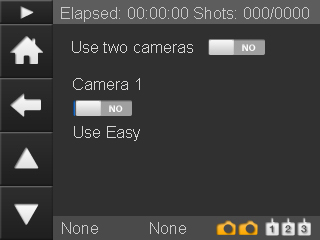
 The current version of the RamperPro supports two different modes. "Easy" mode and "Advanced" mode. More modes, like HDR, will be added in the future. Easy mode is a basic intervalometer while advanced mode provides you full exposure ramping possibilities. At the left you see the movie settings screen that you can reach from the home screen.
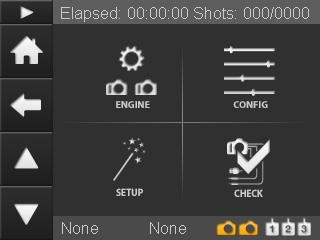
The "ENGINE" screen provides the configuration of the different modes per camera. You can define if you want to use one or two camera's. You can set the desired mode (Easy or Advanced) per camera and you can specify if you want to make a stereoscopic time lapse where two camera's are synchronized. The section below describes the various options of the engine selection screen.
The "CONFIG" screen provides access to the settings of the Easy and Advanced modes per camera. These settings are explained in more detail in the appropriate section of this manual.
The "SETUP" screen shows you the various steps that you need to perform when you want to connect your camera or motion control device to the RamperPro. A future version of this screen will consist of a real wizard that will configure the interface with motion control hardware for you.
THe "CHECK" screen shows a check list that you can use when you are starting a timelapse. This way you cannot make any mistakes when you are configuring your camera. We are working on a new firmware that will automatically check if your camera is connected properly.
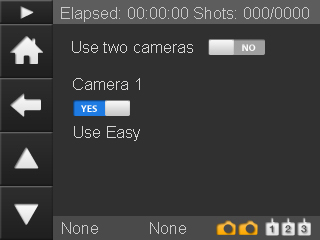
Lets start with describing how you can set the desired engine for your camera(s). The engine selection screen will only show certain options when they are valid. You cannot set the "Stereo" mode when you only select one camera for example. This is a feature that many configuration screens of the RamperPro are using.
The following table describes the settings that you can find on the engine selection screen.
| Feature | Description |
| Use two cameras | Do you want to use one or two camera's? |
| Use Easy | Here you set the actual engine per camera. Set this setting to "Yes" if you want to use the basic intervalometer functionality for the selected camera. Set this value to "No" if you want to use the exposure ramping mode for the selected camera. |
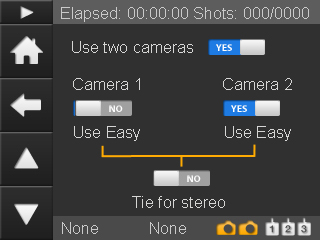
| Tie for stereo | Set this value to "Yes" if you want to make stereoscopic timelapse sequences. You cannot set the value for camera two if you set this to Yes since the settings for camera one will then be used for both camera's. |
The following screens show some examples of various settings on the engine selection screens.
 Only one camera is used in basic intervalometer mode. Only one camera is used in basic intervalometer mode. |
 Only one camera is used in exposure ramping mode. Only one camera is used in exposure ramping mode. |
 Two camera's are used. The first runs in exposure ramping mode. The second camera runs in intervalometer mode. Two camera's are used. The first runs in exposure ramping mode. The second camera runs in intervalometer mode. |
 Two camera's are used in stereoscopic mode. Both camera's will run in exposure ramping mode. Two camera's are used in stereoscopic mode. Both camera's will run in exposure ramping mode. |
It is possible to have one camera in basic mode and one camera in advanced mode. The advanced mode camera must always be camera one in this case. This is because the first camera that is connected to the USB connectors is defined as camera one.
How to edit the runtime parameters
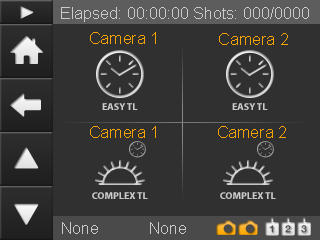 The "CONFIG" button on the parameters screen leads to the screen on the left. The four icons will lead you to the parameters of the time lapse engines.
You can enter all parameters twice; one per camera. You can always use the settings from camera one for camera two. You can do so by setting the "Use camera one settings" flag. All settings are stored for later use. That way you can setup your parameters up-front. Don't be overwhelmed by the large number of parameters that you can set (especially for the exposure ramper). You will probably set most parameters only once and the default values will work in many situations. The full automatic mode of the advanced engine will overrule many settings for example.
Which set of parameters is used?
The RamperPro will use the settings of engine one when you run the controller in stereo mode, so when "Tie for stereo" is selected. This leaves the settings for engine two untouched. There is a flag on all engine two parameter sets that says "Use camera one settings". This means that the controller will use the settings from engine/camera one when you have selected this flag. The controller will use the settings from engine or camera two in all other cases.
Simulation mode
You can always check your expected runtime behavior by running a Simulation. The "Simulate" button is available on the home screen of the RamperPro. The provided simulation will only be shown once when you have selected "tie for stereo" because the two camera's will show the same output. You will see a simulation per camera when you are not running in stereo mode. The provided feedback gives you information about the runtime of the sequence and a lot more.
The simulation screen will also show the real time output of the light sensor when you have selected an advanced engine and when you have configured that you want to use the light sensor. The output shows the change in ambient light (Sun setting, Sun rising) and the measured amount of light in Lux. The calculated EV value is calculated based on the Lux value for ISO 100.